Authorization Control Testing: A practitioner’s Guide

Overview
- Introduction to Broken Access Control (BAC) Testing
- Different types of Broken Access Control
- Common attack surfaces
- Unorthodox attack surfaces
- Attack scenarios (Blackbox, Greybox, Whitebox)
- Final notes
Introduction to Broken Access Control Testing
This is an entry point to access control testing, or Authz testing. In this blog we will cover how to spot Broken Access Controls during blackbox, greybox, and whitebox reviews, make testing easier, and where code review can help you catch issues earlier.
Broken Access Control (BAC) occurs when an application lets a user do, see, or change something they should not.
Often confused with authentication, authorization is about what actions and data are allowed for a given user. This includes preventing unauthenticated users from reaching endpoints that should be protected.
In simpler terms, imagine a building with badge readers. When waving the badge over the card reader, it confirms who is at the door, this is Authentication. Now a regular employee might enter the hallway and lunchroom but not the server room, and even inside the lunchroom a regular employee should not be able to change the menu, this is called Authorization.
If you prefer to skip the theoretical stuff, jump ahead to Attack scenarios.
Different types of Broken Access Control
Authentication boundary failures
- In the case of authentication boundary failures, endpoints that should require a session cookie or authorization token are callable without one.
- The easiest way to check is to see if sensitive paths return 200 without session cookies or authorization headers, or if partial/full data leaks occur on error.
- The easiest way to test is to repeat key flows with no auth, expired tokens, or stripped cookies; you can do this with Autorize’s “Check unauthenticated” option, which we will cover later.
IDOR (Insecure Direct Object Reference) / BOLA (Broken Object Level Authorization)
- In the case of IDOR or BOLA, a user accesses another user’s data by changing parameters across the path, query, body, headers, GraphQL variables, or batch payloads.
- The easiest way to check is to look for predictable identifiers (for example userId, companyId, email) and for responses that change when the parameter’s value is modified, a few examples of this will follow later in the blog.
Broken Function Level Authorization (BFLA)
- In the case of BFLA, an action endpoint lacks a server-side permission check, or the check exists only in the front end. This often results in vertical privilege escalation, where a low-privileged or unauthenticated user performs actions intended for higher-privileged roles such as administrators or moderators.
- The easiest way to test for this would be to call restricted functions directly by using proxy tools to bypass the UI, and replay the same request to see if the same response is returned.
Mass parameter assignment
- In the case of mass parameter assignment, also known as mass assignment, the server accepts and persists client-supplied fields that should be protected, such as roleId, userId, ownerId, or status.
- The simplest way to check and test is to send a minimal valid update, then add one candidate sensitive field and read the response back to see if the change stuck. Any field that controls privileges (role, isAdmin), enforces ownership or tenancy (ownerId, companyId), selects target identities (userId, accountId), or indirectly grants access (e.g., email if switching to @company.tld alters rights)
Common attack surfaces
REST or JSON APIs
- Look for identifiers in the path, query, body, or headers such as userId, companyId, orderId, fileId.
- Probe by replaying a request and changing only one identifier at a time across those carriers. Start read-only and compare responses.
Admin or hidden endpoints
- Hunt for admin routes in JavaScript bundles, OpenAPI, source maps, or error messages.
- Call them with a normal user session or token; try alternate HTTP methods on the same path and watch for missing step-up prompts.
Search, list, and filter endpoints
- Watch for filters like ownerId, tenantId, includeDeleted, status, fields.
- Toggle a single filter per request and check if results leak across users or tenants, including on later pagination pages.
Unorthodox attack surfaces
GraphQL
- Resolver checks can be per-field. Nesting or aliasing may cross boundaries.
- Request related objects that jump ownership (for example from me to another user’s resources) and compare results between roles.
WebSockets or gRPC
- Authorization is often enforced at connect time but not on every message.
- Stay connected as a normal user and emit events that reference other resources like chatId or roomId. Repeat after a role downgrade to see if the channel still accepts actions.
File or object storage and presigned URLs
- Keys may encode tenantId or companyId; URLs may have long TTLs or be reusable.
- Send HEAD to returned URLs, tweak the identifier segment in the key, and re-test after role or tenant changes to confirm ownership is enforced at download time.
Exports, reports, and scheduled jobs
- These often run under a privileged service identity and skip per-record checks.
- Request exports by reportId you did not create and verify whether the output includes records from other users or tenants.
Attack Scenarios
Attack Scenario #1 (Black-box)
The first scenario is simple: a webpage that allows registration and login, alongside a note creation functionality.
The first thing we do is create a user and log in.
Afterwards we create a note.
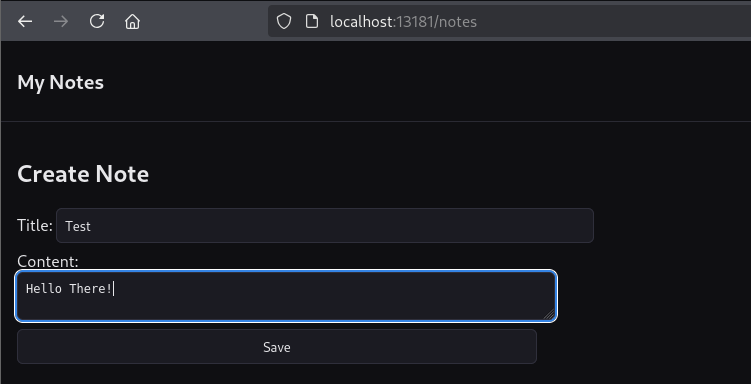
Upon creating the note, we get redirected to the note view.
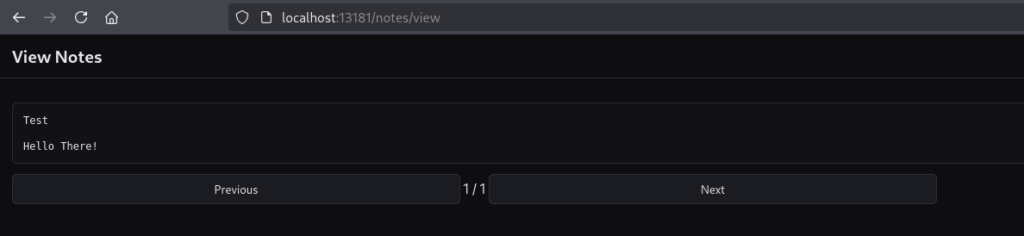
The “Previous” and “Next” buttons raise a question, how does the server fetch the notes? Does it, A: render all notes at once, which seems inefficient, or B: is something fishy going on in the back-end?
We check the back-end (in my case I used Burp Suite, the same can be done via DevTools -> Network) to find that aside from the initial GET request, a secondary request is sent.

We send this request to the Repeater tab and try changing the id parameter.
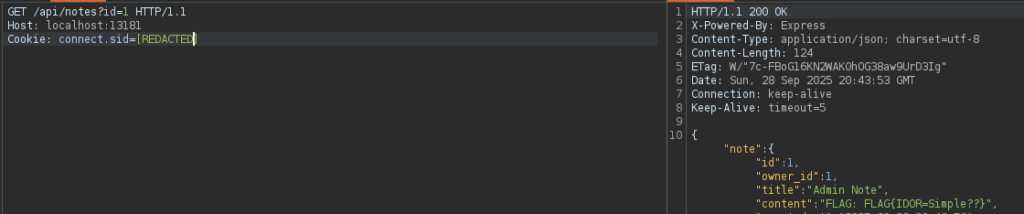
This allows us to see the admin note and obtain the flag, confirming our IDOR suspicions.
Word of caution:
- If a request does not return a visible response, indicating a blind condition, avoid proceeding with testing without careful consideration and explicit permission, as doing so may result in unintended damage.
Attack Scenario #2 (Grey-box)
For this next scenario, the client provided two sets of credentials:
- admin:adminpass123
- user:userpass123
For side-by-side sessions I will be using PwnFox which is a Firefox/Burp Suite extension that allows usage of multiple sessions within a browser. To use it, import the JAR into Burp, download the Firefox Extension, launch two containers, and assign one to the admin and one to the user.
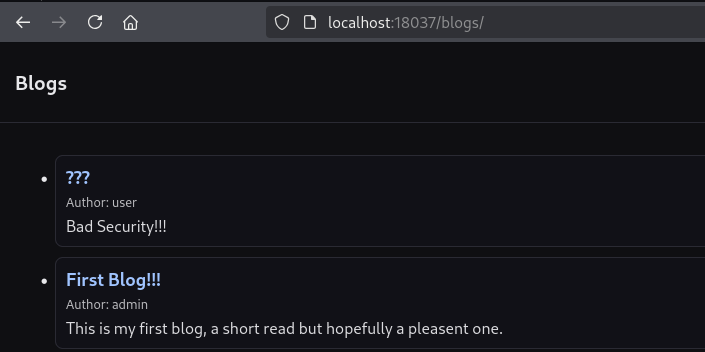
We log in with both roles. As an admin, we can access the admin panel, where the blog post creation feature is, and use it to create a new post.
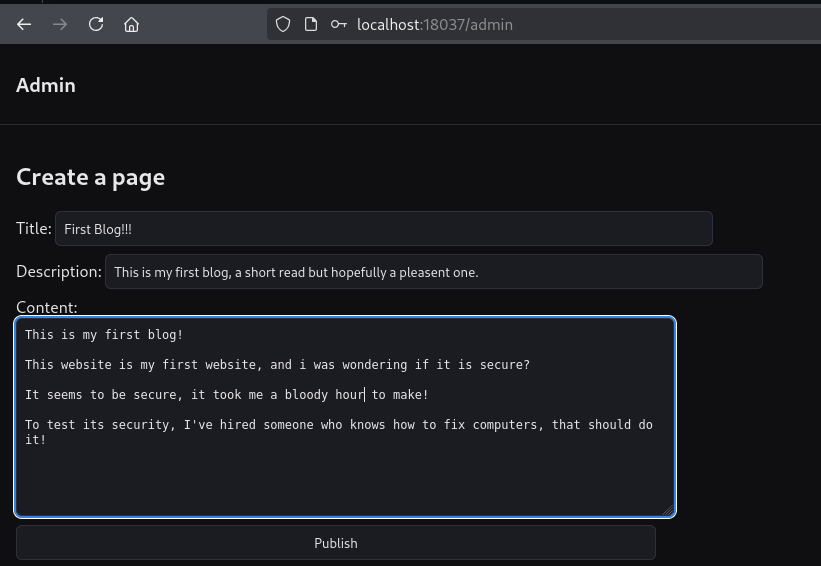
This operation then triggers the following request to the back-end:

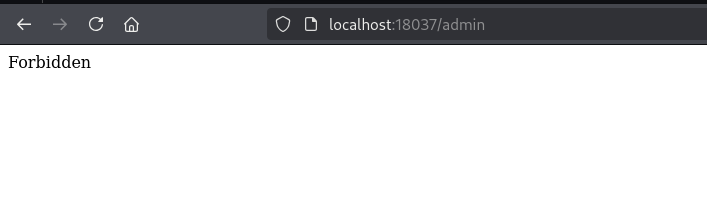
If we try to access “/admin” as a regular user, the server responds with 403 Forbidden.
In Burp Suite we send the “POST /api/admin/pages” request to the Repeater tab, and in the HTTP history we find a request from a regular user, and then copy that user’s session token (cookie).
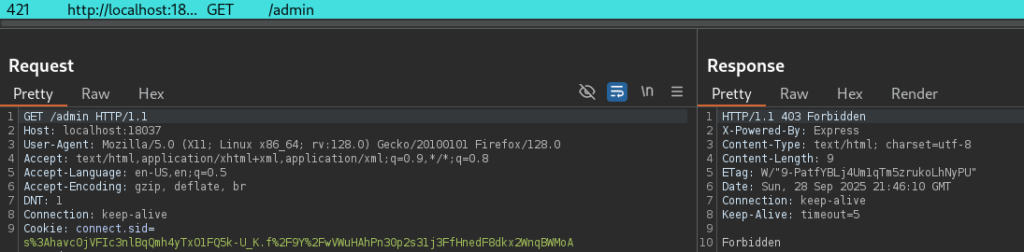
/admin endpoint showing a 403 Forbidden status when accessed without proper privileges.In the Repeater tab, we change the session token to the regular user’s and send the request.
As seen from the screenshot below, the request went through successfully.

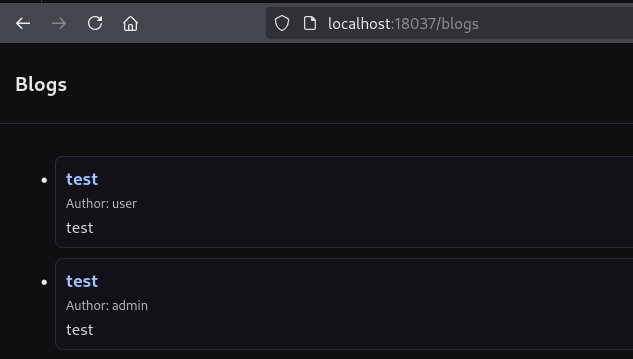
200 OK response after replaying the admin request with a regular user’s session.Back in the web application, a new blog page shows up, confirming our suspicion of BFLA.
To make this easier, we could have used Autorize, a Burp extension built specifically for access control testing.
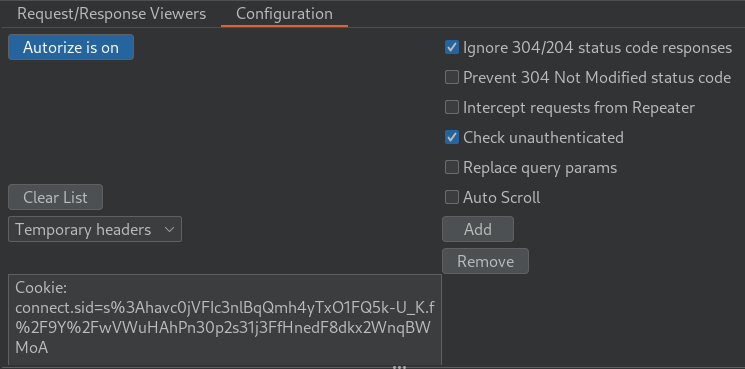
To use it, paste the cookie of the user you want to test with (in this case, the regular user’s cookie) and turn Autorize on.
Back in the web app, create another blog post as the admin, then head back to Autorize.
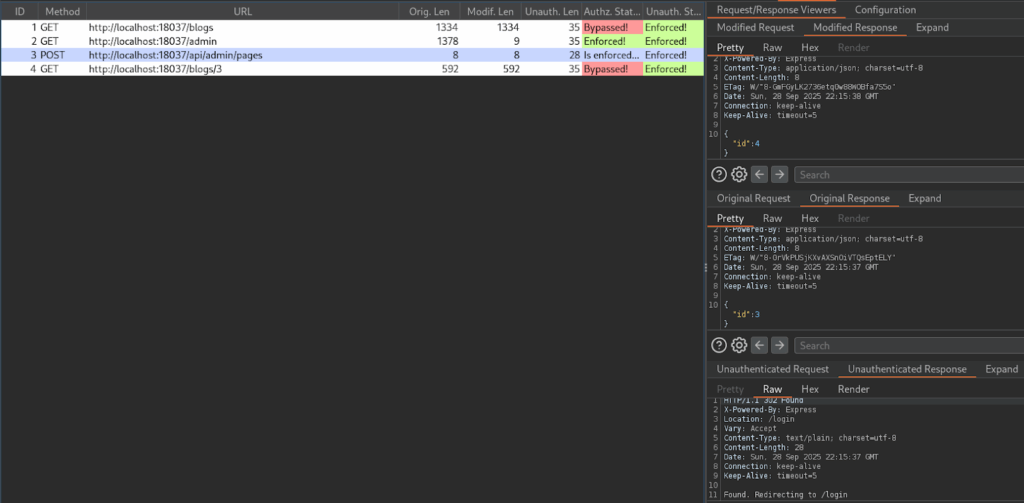
As demonstrated by the screenshot above, both the original response and the one with the regular user’s token return 200 OK, confirming BFLA. The unauthenticated request (no cookie) returns 302 Found, redirecting to the login page.
To learn more about PwnFox and Autorize, YesWeHack has a great blog post covering both tools.
Attack Scenario #3 (White-box)
The following source file contains a Broken Access Control issue. Try to spot the vulnerable lines yourself. If you’re stumped, scroll down for the answer and explanation.
const express = require("express");
const mongoose = require("mongoose");

const app = express();
app.use(express.json());

mongoose.connect("mongodb://127.0.0.1:27017/BAC_demo", {
  serverSelectionTimeoutMS: 1500,
}).catch(() => {});

const userSchema = new mongoose.Schema({
  displayName: { type: String, default: "" },
  bio:         { type: String, default: "" },
  timezone:    { type: String, default: "UTC" },
  avatarUrl:   { type: String, default: "" },

  role:          { type: String, default: "user", enum: ["user", "admin"] },
  isAdmin:       { type: Boolean, default: false },
  planTier:      { type: String, default: "free", enum: ["free", "pro", "enterprise"] },
  credits:       { type: Number, default: 0, min: 0 },
  emailVerified: { type: Boolean, default: false },
  ownerId:       { type: mongoose.Schema.Types.ObjectId, index: true },
}, { timestamps: true });

const User = mongoose.model("User", userSchema);

async function authStub(req, res, next) {
  try {
    const userId = req.header("x-user-id");
    if (userId) {
      const u = await User.findById(userId);
      if (!u) return res.status(401).json({ error: "unknown user" });
      req.user = u;
      return next();
    }
    let demo = await User.findOne({ displayName: "demo-user" });
    if (!demo) demo = await User.create({ displayName: "demo-user" });
    req.user = demo;
    next();
  } catch (e) { next(e); }
}

app.post("/api/users", async (req, res, next) => {
  try {
    const user = await User.create(req.body);
    res.status(201).json({ id: user._id });
  } catch (e) { next(e); }
});

app.get("/api/users/me", authStub, async (req, res) => {
  const u = req.user.toObject();
  res.json({
    id: u._id,
    displayName: u.displayName,
    bio: u.bio,
    timezone: u.timezone,
    avatarUrl: u.avatarUrl,
    role: u.role,
    isAdmin: u.isAdmin,
    planTier: u.planTier,
    credits: u.credits,
    emailVerified: u.emailVerified,
    ownerId: u.ownerId,
  });
});

app.patch("/api/users/me", authStub, async (req, res, next) => {
  try {
    await User.updateOne({ _id: req.user._id }, { $set: req.body })
    res.json({ ok: true });
  } catch (e) { next(e); }
});

app.post("/api/credits/grant", authStub, async (req, res, next) => {
  try {
    await User.updateOne({ _id: req.user._id }, { $set: req.body });
    res.json({ ok: true });
  } catch (e) { next(e); }
});

app.use((err, _req, res, _next) => {
  console.error('Error:', {
    message: err.message,
    stack: err.stack,
    timestamp: new Date().toISOString()
  });
  res.status(500).json({ error: 'An unexpected error occurred' });
});

const PORT = process.env.PORT || 8000;
app.listen(PORT, () => console.log(`Listening on http://localhost:${PORT}`));
If you were able to find the vulnerable lines, congratulations! If not I’ll explain:
The vulnerable code snippets are:
- const user = await User.create(req.body); // in POST /api/users
- await User.updateOne({ _id: req.user._id }, { $set: req.body }); // in PATCH /api/users/me
- await User.updateOne({ _id: req.user._id }, { $set: req.body }); // in POST /api/credits/grant
These lines enable Mass Parameter Assignment due to missing input validation and boundary checks, allowing users to inject arbitrary fields. This can lead to privilege escalation (e.g., toggling isAdmin or changing role), manipulation of planTier or credit balances, and modification of other fields that should not be user-controlled.
An example attack would be the following:
POST /api/users HTTP/1.1
Host: localhost:8000
Content-Type: application/json
Content-Length: 76

{
  "displayName": "malicious-user",
  "isAdmin": true,
  "credits": 99999
}
For the developers, here’s how to fix it:
To prevent mass parameter assignment, always validate and whitelist allowed fields:
- For POST /api/users, use an allowedFields array alongside lodash’s _.pick function:
const allowedFields = ['displayName', 'bio', 'timezone', 'avatarUrl'];
const userData = _.pick(req.body, allowedFields);
const user = await User.create(userData);- For PATCH /api/users/me, same pattern with _.pick:
const allowedFields = ['displayName', 'bio', 'timezone', 'avatarUrl'];
const updateData = _.pick(req.body, allowedFields);
await User.updateOne({ _id: req.user._id }, { $set: updateData });- For POST /api/credits/grant, enforce RBAC and whitelist input with _.pick:
if (!req.user.isAdmin) return res.status(403).json({ error: "Admins only" });
await User.updateOne({ _id: req.user._id }, { $inc: { credits: req.body.credits || 0 } });
Final Notes
Broken Access Control (BAC) is a critical vulnerability, topping OWASP’s Top 10 (A01:2021) due to its potential for unauthorized access or privilege escalation.
Some takeaways:
- Start with read-only checks, then controlled writes on your own test data.
- Treat every identifier as suspect. Swap one at a time across path, query, body, and headers.
- Enforce authorization where data lives. Add tenant and ownership predicates in queries, not only in controllers.
- For tokens, the resource server must verify audience, issuer, and scopes. Do not rely on the UI.
To deepen your skills, practice with the white-box demo code, explore OWASP’s BAC resources, or try Burp Suite’s tutorials.